Due to popular demand, here’s the very first article of a long series on Sharegate Q&A. The aim of this piece is to provide you with the information you need to give you more independence and freedom when using our tool on a day-to-day business. In addition to making you feel more comfortbale and confident with Sharegate’s features, this article will allow you to skip the wait for an answer from our support ninjas (even though they are renowned for their response time!).
How do I transfer a Sharegate license from one machine to another?
It truly is a wonderful day. Not only have you discovered an awesome tool through multiple rounds of testing, you also found a great live demo done by Office 365 MVP Benjamin Niaulin. After giving all the features an in-depth overview, you decide to go with the full version of Sharegate, since you need to migrate your entire site. It’s really simple, you receive your 1-seat Sharegate license key, and you’re happily on your way to a fast migration, and an even better SharePoint management experience than you could have ever imagined. For the purpose of clarification here, a seat simply means that one user can use Sharegate on a licensed machine at a time.
Fast-forward in time: you performed your site migration, and even used the “Incremental copy feature” to copy only items that have changed, and now you’re done. Since purchasing a license allows you to use Sharegate for 12 months, you’ve decided to transfer Sharegate to the developers’ team so they can use Sharegate, on a daily basis, to migrate from their Dev environment to production.
You’ve browsed the documentation on how to move a license, but you still want to make sure that you’ve covered all your angles – so you send an email to the support ninjas at Sharegate.
As always, you quickly get an answer telling you not to worry because the license transferring process is really simple. As a matter of fact, the entire process is carried out in 2 easy steps: First, you need to deactivate the Sharegate license that is currently in use on your machine. Then, you can simply go ahead and activate it on another machine, or lend it to John in the Dev team. Making the process this simple ensures that you limit your turnaround time and get the most out of Sharegate. By the way, 10 and 25 seats license are also available, so more than one user can take advantage of the Sharegate’s great day-to-day use capabilities and features.
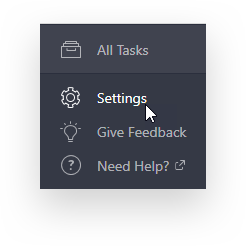
Deactivating your Sharegate License in two steps:
- In Sharegate, click Settings on the bottom left menu.
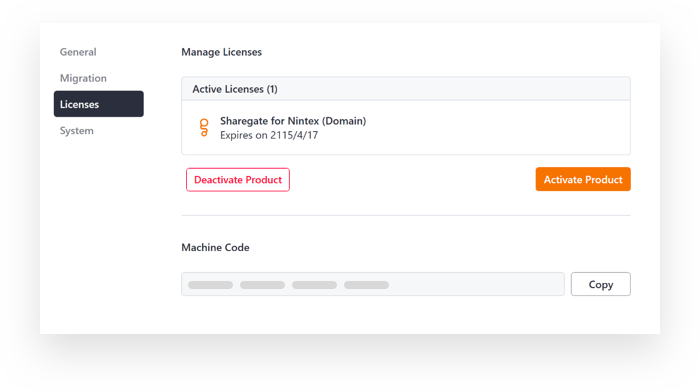
- Select Licenses in the tabs on the left then click “Deactivate Product”.
For more information on how Sharegate’s licensing works, make sure to read our documentation article.
In short, always be sure to deactivate Sharegate before making configuration changes to the machine it is installed on (such as re-imaging, changing the machine name, or changing hardware parts), or moving the license. The reason for this is that Sharegate locks the license with a machine when it is activated. Therefore, performing such configuration changes prevents Sharegate from recognizing the machine as the one it was previously activated on (and so it appears as deactivated).
Happy Migration!